A good product demo lets someone see the result before they need an explanation. You do not need to tour every feature. Start with one problem, show one action, and finish with the visible outcome.
For an indie hacker, that might be a short video for a landing page, a launch post, or a reply to a customer. The recording needs readable UI, clear sound when you speak, and enough focus for viewers to follow the important interaction.
Choose one result before you record
Write a three-line outline: what the user needs, what they do, and what changes. For example: “I need the PDF I downloaded yesterday. I search for it. I open the right file.” That gives the recording a beginning and an end.
Aim for 30–60 seconds as a useful starting point for a short walkthrough, rather than a rule for every video. A support explanation may need longer. A quick launch clip can be shorter. Remove anything that does not help the viewer understand the result.
Problem. Show the starting situation briefly, with the relevant app already open.
Action. Perform the one interaction that creates value. Pause briefly so the viewer can see it.
Result. Leave the successful outcome visible before ending the clip.
Use sample data, close unrelated windows, and turn on Focus to reduce interruptions. Make text large enough to read in the final placement. A demo that looks clear on your monitor can become hard to follow inside a small social post.
Start with Mac’s built-in screen recorder
For a straightforward capture, press Shift–Command–5, select the recording area, and open Options to choose a microphone if you want narration. Start the recording and stop it from the menu bar. Apple also documents recording through QuickTime Player.
The built-in recorder is a useful starting point when you want to show a process without additional presentation editing. Its click indicator and microphone options are described in Apple’s screen recording instructions; available options depend on your macOS version.
If the important detail is a small field or button, a closer view can help. SuperNotch adds an editing workflow where you can place zooms, choose their centers, remove clips, and export the finished recording.
Record the workflow with SuperNotch
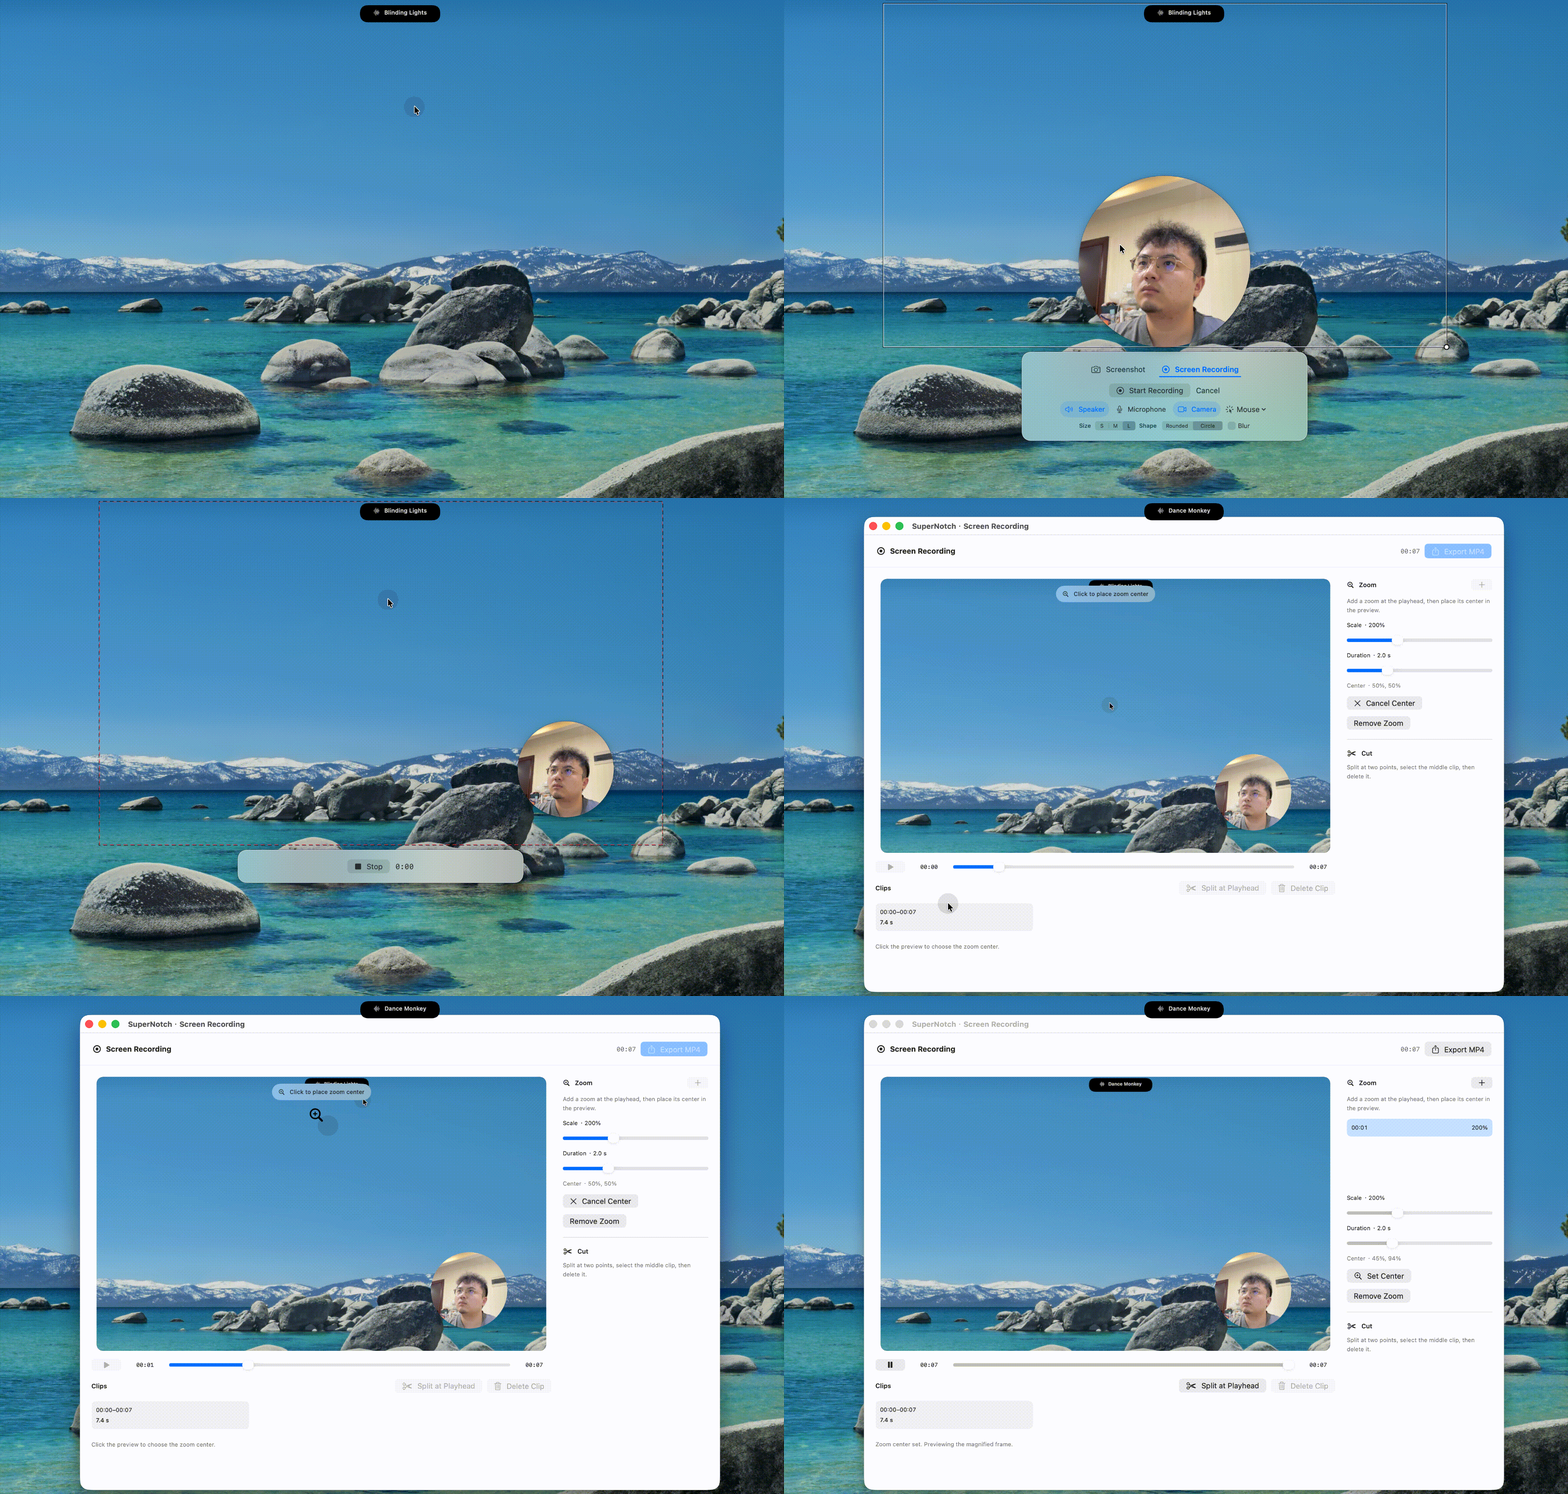
Open Screen Recording in SuperNotch and choose Select Recording Area. Draw a region around the relevant part of your app. Capture enough context for viewers to understand where they are, while keeping unrelated desktop space out of the frame.
In the recording toolbar, choose the microphone and camera options you need, then click Start Recording. SuperNotch requests the relevant macOS access when required. Record a short test first so you can check sound, framing, and camera placement before doing the full take.
Show the action at a comfortable pace. Avoid moving the pointer while you are thinking. After the result appears, leave it visible for a moment and stop recording. Open the recording in the editor to refine it.
Make the important UI readable
Cursor zoom should guide attention toward the interaction. Use it where the viewer needs a closer look: a small button, a search result, a setting, or the output your product creates.
In SuperNotch’s editor, place the playhead near the important moment and add a zoom. Use Set Center to choose the focus point in the preview, then adjust its scale and duration. This is an editable zoom you place yourself, so the focus can follow the useful UI instead of every incidental pointer movement.
Preview the full transition. Keep enough surrounding context for the viewer to understand the change, and avoid zooming so far that the result disappears outside the frame. A practical first pass is one zoom for the main action and another only if the result genuinely needs it.
Watch the same moment at its original framing and with your zoom. Does the target become easier to identify? Can you still see what happened after the click? Keep the zoom when both answers are yes.
If you include a camera, check that it does not cover the control or output you are demonstrating. Narration should explain why the action matters; it does not need to name every button that viewers can already see.
Cut pauses, export, and watch the file
Remove setup time, long waits, and mistakes that interrupt the story. In SuperNotch’s cut workflow, split at two points, select the middle clip, and delete it. Preview the join to make sure the action still makes sense.
Choose Export MP4 to save the edited recording. Watch the exported file from start to finish before uploading it. Check the first frame, important text, audio, zoom timing, and final result. Also try watching without sound: the visual action should still be understandable.
For a landing page, introduce what the demo proves next to the video. For a social post, keep the caption focused on the same problem and result. For support, send the smallest explanation that answers the customer’s question.
You can pair a demo with a selected-area screenshot of the final state. If finding the right file is the starting problem, see the Smart Search guide. For choosing the broader toolkit, read the MacBook notch app comparison.
Common questions
Do I need a webcam for a product demo?
No. Use a camera when your presence helps explain the task. Screen-only recordings work well when the interaction and result are the whole story.
Does SuperNotch automatically choose every zoom?
This guide uses the editor’s manual zoom workflow: add a zoom, set its center, and adjust scale and duration. Review those choices for your recording.
What if I only need a basic recording?
Start with the built-in Mac recorder. Consider SuperNotch when you want region recording, optional camera capture, editable zooms, and clip removal in the same toolkit.
Show the useful part.
Try Screen Recording in SuperNotch during the free three-day trial. The same toolkit also includes screenshots, Smart Search, and clipboard history.
Try SuperNotch